RepOne Sensor and Tether
Firmware Updates for RepOne Sensors and Tether (v0.8.34 and Newer)
Firmware Updates for RepOne Sensors and Tether (v0.8.34 and Newer)
If you’re on firmware version 0.8.34 or newer, you won’t notice any dramatic changes in features. However, you’ll experience greater reliability in Bluetooth connections, battery readings, and power state transitions (entering/exiting low power mode).
For those upgrading from 0.6 or 0.7, here’s what you can expect from the latest firmware:
What’s New?
- RepOne Tether Support
- Improved electronics mean better battery life, enhanced LED functionality, more responsive tilt navigation, and support for advanced metrics like power and force coming in future firmware updates.
- New Rest Time Metric
- If you’ve used OpenBarbell before, you might remember the rest counter at the top-center of the screen. This timer is now on all RepOne Sensors and Tethers, displaying rest between reps in minutes, right on the OLED screen.
- Reduced Minimum ROM Threshold to 130mm
- Previously, the minimum range of motion (ROM) was 150mm, which didn’t accommodate some users (like those with a high bench arch). The new 130mm ROM threshold is perfect for more flexible users without compromising accuracy.
- Improved Tilt Navigation
- We’ve completely re-written the tilt control algorithm, making it more responsive and intuitive. LEDs now blink to confirm when you’ve tilted enough to switch reps, providing instant feedback.
- Reduced Standby Power Usage
- Newer RepOne Tethers feature low-power electronics that allow for longer battery life. By turning off higher-powered components during standby mode and relying on a low-power accelerometer, users get an extra session or two between charges. If left on in a gym bag, the battery lasts significantly longer.
- LED Enhancements
- LED indicators now provide more clarity during use:
- Blue: Connected to Bluetooth
- Purple: Low battery
- Dim Glow: Indicates the device is awake and ready to record data
Bug Fixes
This firmware includes many fixes, such as:
- Resolved Bluetooth connection issues.
- Addressed over-the-air firmware update problems.
- Improved handling of low power mode, ensuring devices require less charge to wake up.
With these updates, we’re confident this is the best version of the RepOne Tether yet. Whether it’s improved reliability, power efficiency, or new features, this firmware delivers an even better user experience.
Setting Up the RepOne 3D Motion Sensor/Tether
Follow these simple steps to get started:
1. Turn On the Sensor
- Locate the switch on the bottom of the unit and turn it to the ON position (indicated by a "+" sign).
Troubleshooting Tip: If the unit doesn’t turn on or seems like the battery is low, charge it using the included cable. Not all chargers are compatible.
2. Connect to the RepOne Personal App
- Open the RepOne Personal app and go to the Settings tab.
- Find your device number in the list and tap it to connect.
- Don’t have the app yet? Search for RepOne Personal in your app store.
- Don’t have the app yet? Search for RepOne Personal in your app store.
3. Attach the Tether
- Place the magnetic base of the sensor on a metal surface, such as a plate or rack.
- Use the included strap or a roller magnet accessory (if available) to attach the tether to your barbell or the object you’ll be tracking.
4. Start Your Workout!
- Open the Workout tab in the app, start lifting, and watch as sets are automatically created.
- Add details like exercise name, load, and more.
- Pro Tip: Turn off the sensor between sessions to conserve battery life.
Navigating Reps
Navigating Reps with RepOne Sensor
Tilt Navigation
- Starting with firmware version 0.6, you can navigate reps on the RepOne Sensor screen using tilt controls:
- Tilt left: View older reps.
- Tilt right: View newer reps.
- Note: The display is not touch-sensitive; pressing the arrows will not navigate reps.
Tilt Technique
- If you're having trouble tilting effectively, refer to this quick example:
Clearing Reps
- You can clear reps stored on the device using tilt controls. For a step-by-step guide, visit:
Built-in Protections
- Tilt functionality includes protections to prevent accidental navigation or rep deletion (e.g., when shaken or carried in a bag).
- Curious about the mechanics? Check out this state machine diagram:
RepOne Sensor/Tether Details
RepOne Sensor Specifications
Tether Length
- Each RepOne Sensor includes a tether that is approximately 2800mm (110 inches) long.
- Tethers only need to exceed 2600mm to pass quality control (QC).
Screen Size
- The screen on top of the sensor measures 28.86mm x 28.86mm (1.25 inches x 1.25 inches).
Weight
- A RepOne Sensor weighs approximately 1.7 lbs (0.77 kg).
Understanding the RepOne Sensor
The RepOne Sensor is designed to track your movements during exercise by identifying the starting and ending points of each repetition based on changes in direction. Importantly, it only records repetitions that are over 150mm in length, filtering out smaller, unintended movements.
Analyzing Range of Motion (ROM) Data
Range of Motion (ROM) data is a key metric provided by the RepOne Sensor. Here's how it helps:
- Identifying Reps:
- If you see two ROM values within the range of 1150-1200mm, followed by another around 600-700mm, and perhaps one or two shorter ROM superfluous reps, you’ve likely completed two valid repetitions.
- Eliminating Noise:
- Short ROM movements or bounces over 150mm that occur outside of valid reps are excluded, allowing you to focus on actual performance.
Example: Analyzing a Snatch
When performing a snatch, the ROM data breaks down as follows:
- First Phase:
- The full snatch, from the start to the catch, is one continuous motion. No changes in direction should occur due to conservation of momentum.
- Second Phase:
- The recovery or finish of the snatch is the second distinct movement.
Additional Data Points:
- Any ROM values outside these two phases are likely caused by:
- Walking forward or backward.
- Bounces that exceed 150mm.
Benefits of ROM Analysis
By focusing on ROM data, you can:
- Track Progress: Monitor your performance over time.
- Identify Areas for Improvement: Pinpoint inefficiencies or inconsistencies in your movements.
- Validate Reps: Ensure that only meaningful repetitions are counted by the sensor.
3D Positioning (upcoming firmware update)
Upcoming Firmware Update: 3D Positioning
The next firmware update for the RepOne Sensor introduces 3D positioning, improving metrics accuracy by accounting for lateral travel. This means that the sensor’s position on the floor will no longer significantly affect accuracy.
However, extreme angles (approaching 90° between the tether and its neutral position) may still result in errors, as they fall outside the sensor’s measurable "cone" of 3D space. These situations are usually easy to identify if the sensor is in an unusual position.
Rule of Thumb:
For every 18 inches the sensor is positioned away from directly under the bar, accuracy decreases by approximately 10%.
Positioning Tips for Accuracy
- Consistency Matters:
Placing the sensor in the same spot and unracking to the same position every session reduces the impact of lateral movement on your data. This is especially important if:- You’re comparing your data with others.
- Your setup varies between sessions.
Protecting Your Tether
The tether’s angle during use affects its lifespan. To keep the tether intact:
- Avoid Extreme Angles:
Pulling at extreme angles can cause the tether to rub against the small eyelet in the sensor’s housing, potentially fraying its nylon coating. - Minimize Wear:
The more extreme the angle, the greater the potential for wear and tear.
Tether Maintenance
To maintain the nylon coating:
- Use 303 Aerospace Protectant (or a similar product).
- Spray a small amount on a paper towel.
- Fully extend the tether, gently squeeze the base of the tether with the sprayed paper towel, and let it retract back into the sensor.
Recommended Frequency:
- Perform this maintenance monthly or whenever the tether feels "tacky" or dry.
Charging Your Sensor
Charging Your RepOne Sensor
How to Charge:
- Use the charging cable included with your order (USB-A to USB-C with a RepOne logo).
- Some USB-C chargers may not be compatible with the RepOne Sensor because it doesn’t support USB PD (a charging standard requiring device-charger communication).
- With the provided cable, compatibility issues should not occur.
Low Battery Indicators:
- If the battery is below 3%, you’ll see a "Low Battery" screen or the RepOne logo will flash multiple times.
- Plugging in a compatible charging cable will show a charge indicator on the screen (after ~5-10 minutes if the battery is below 3%).
Charging Time:
- Full charge: ~1.5 hours.
- Quick session charge: ~15 minutes.
Specifications:
- Battery Capacity: 2000mAh (similar to most phone batteries).
- Battery Life:
- Up to 1 month with responsible usage.
- Approximately 48 hours if left on continuously.
⚠️ The RepOne Sensor behaves like a flashlight rather than a TV remote—leaving it on will drain the battery quickly. If below ~40%, it may die overnight.
Troubleshooting:
If your sensor isn’t charging, follow these steps:
- Check Firmware:
- Open the RepOne Personal App, navigate to Settings, and connect your RepOne Tether via Bluetooth to check for updates.
- Charge with the Original Cable:
- Plug into a standard outlet with the power switch turned off and charge for 2 hours.
- Test the Charging Cable:
- Try the cable on another device to confirm it’s working.
- Confirm the Sensor Screen Works:
- Turn on the sensor and connect it to the app via Bluetooth. Check if the device appears in the settings tab after pulling the sensor.
- Inspect the Charging Port:
- Gently jiggle the USB port without the cable plugged in to ensure it’s intact.
- Check the Power Switch:
- Make sure the switch isn’t blocked from reaching the "on" position.
Need Help?
If you’re still unable to charge your RepOne Tether, contact customer service for assistance.
Need a New Cable?
Purchase a compatible charging cable here.
How to Update the Firmware
Updating Your RepOne 3D Motion Sensor Firmware
Stay up-to-date with the latest features and improvements by checking for firmware updates.
Steps to Update:
- Open the Settings tab in the RepOne Personal app.
- Ensure you're connected to the sensor you want to update.
- In the Firmware Update section at the top of the screen:
- You'll see the latest available version and the version currently installed.
- If a newer version is available, tap Download to get the firmware.
- After the download, make sure you're still connected to the sensor and tap Install.
- The app will install the firmware and restart your unit. You're now up-to-date!
- Updating multiple devices? The firmware file remains in the app, so simply connect to each sensor and hit Install without re-downloading.
Troubleshooting:
- If your firmware isn’t updating, try using an iOS device for any updates prior to version 0.7.15.
- Still having issues? Contact us at help@getrepone.com and let us know which mobile device you’re using. We’ll assist you promptly!
Getting Started
How Our 1RM Estimation Algorithm Works
The RepOne app estimates One Rep Max (1RM) based on the principle that as weight increases, velocity decreases in a linear fashion. By plotting weight vs. velocity and applying linear regression, we can extrapolate your estimated max.
Step-by-Step Breakdown
1️⃣ Identify Relevant Sets (Black Flow Chart)
- Only includes sets that match exercise name, tags, and date range.
- Sets must have weight data and at least one valid rep.
2️⃣ Filter Out Bad Data (Red Flow Chart)
- Removes sets with impossible ROMs (too high or low).
- Eliminates sets with unrealistic velocities (>10m/s or ≤0m/s).
- These invalid sets appear as red dots on your chart.
3️⃣ Select the Most Relevant Sets (Blue Flow Chart)
- Filters sets per workout by choosing either:
- The set with the highest RPE 1RM (based on RTS’s RPE charts).
- OR the first set logged at a given weight.
- Groups weights into 2.5 lb buckets (e.g., 84.5 lbs & 86 lbs go into the 85 lb bucket).
- Uses the latest set in each bucket for the final regression (shown as dark blue dots).
How to Get the Most Accurate Estimated 1RM
One Rep Max (1RM) estimation in the RepOne App is based on linear regression, which plots your data on a graph. To ensure the most accurate results, follow these best practices:
Tips for Improving 1RM Estimation
✅ Log a full range of weights – Record everything from warmups (empty bar) to working weights for better regression accuracy.
✅ Use consistent exercise names & tags – Avoid mixing different exercises under the same name (e.g., log "Back Squat" and "Front Squat" separately).
✅ Always log weights – The algorithm needs weight data to plot points accurately.
✅ Set the correct unit (kg/lb) – Ensure your weight units are correctly set in Settings to avoid miscalculations.
✅ Erase false reps – Remove accidental reps caused by unracking or adjusting equipment.
✅ Enter RPE for every set – The algorithm factors in RPE 1RM to refine estimates.
✅ Tag multiple lifters if sharing an account – Use tags to isolate individual performance data.
By following these steps, you can achieve more accurate 1RM calculations and track strength progression effectively.
RepOne Set Metrics
The RepOne Personal App offers various Set Metrics, which provide insights into performance based on completed sets. These metrics help track progress and optimize training.
Average Velocity Metrics
- Average Set Velocity – The average of all rep velocities in a set, useful for tracking fatigue and progress.
- Absolute Average Velocity Loss – Measures velocity loss over a set.
- Set Average Velocity Loss – Difference between first and last rep velocity.
- Percent Average Velocity Loss – Velocity loss expressed as a percentage.
- First Rep Average Velocity – Helps gauge initial strength post-rest.
- Last Rep Average Velocity – Common for autoregulation, correlating with set RPE.
- Minimum Average Velocity – Lowest recorded velocity in a set.
- Maximum Average Velocity – Highest recorded velocity in a set.
- Slowest Ever Average Velocity – Tracks slowest recorded velocity over time.
- Fastest Ever Average Velocity – Tracks highest recorded velocity over time.
- Peak-End Average Velocity – Averages last and slowest velocity in a set for effort measurement.
Peak Velocity Metrics
- Average Peak Velocity – Average of all peak velocities in a set.
- Absolute Peak Velocity Loss – Difference between fastest and slowest peak velocities.
- Set Peak Velocity Loss – Difference between first and last peak velocities.
- Percent Peak Velocity Loss – Velocity loss displayed as a percentage.
- First Rep Peak Velocity – Peak velocity of the first rep.
- Last Rep Peak Velocity – Peak velocity of the last rep.
- Minimum Peak Velocity – Slowest peak velocity in a set.
- Maximum Peak Velocity – Fastest peak velocity in a set.
- Fastest Ever Peak Velocity – Highest recorded peak velocity over time.
- Slowest Ever Peak Velocity – Lowest recorded peak velocity over time.
- Peak-End Peak Velocity – Average of slowest and last peak velocity in a set.
Range of Motion (ROM) Metrics
- Absolute ROM Loss – Difference between longest and shortest ROM in a set.
- Set ROM Loss – Difference between first and last ROM in a set.
- Percent ROM Loss – ROM loss displayed as a percentage.
- First Rep ROM – ROM of the first rep in a set.
- Last Rep ROM – ROM of the last rep in a set.
- Minimum ROM – Shortest ROM in a set.
- Maximum ROM – Longest ROM in a set.
- Peak-End ROM – Averages shortest and last ROM in a set.
Rate of Perceived Exertion (RPE)
- Set RPE – Subjective difficulty rating for a completed set.
These Set Metrics allow for in-depth tracking and customization within the RepOne Personal App, helping lifters monitor their performance efficiently.
Logging Workouts in RepOne Personal
- Open the RepOne Personal app and connect to your RepOne Tether.
- Navigate to the Workout tab.
- Ensure your sensor is connected (check the bottom left of the screen) and that your phone is within a reasonable distance for a stable Bluetooth connection.
Entering Workout Details
You can log the following for each set:
- Exercise
- Weight
- RPE
- Tags
- Record Video
Completing Your Workout
- After finishing a set, repeat the steps above for the next set or a new exercise.
- When your workout is complete, click "Finish Workout" (bottom right). This will move all recorded reps and sets to the History tab.
Accessing Workout History in RepOne Personal
- Open the RepOne Personal app and connect to your RepOne Tether.
- Navigate to the History tab.
- Use Add Filters to find specific sets and reps.
Recovering Deleted Reps
If you have deleted reps, you can retrieve them by following these steps:
- Go to History > Filters > Show Deleted Sets and Reps > Apply.
This will restore any deleted workout data.
Trouble Shooting
Clearing Reps from your Sensor
Clearing Reps from Your RepOne Sensor
Reps are stored locally on your RepOne Sensor until manually cleared. Each device can hold around 100 reps. As you log reps beyond 100, the oldest reps are automatically deleted to make space for new ones. If you notice the rep count exceeding 100, this is why.
To start fresh (e.g., at the beginning of a new workout):
- Tilt the sensor right twice.
- Follow the on-screen instructions to clear the stored reps.
If Your Tether Is Inside Your Sensor
To access the tether:
- Remove the top screws using an Allen wrench.
- Use a USB cable to push down the charging port and lift the case.
- Disconnect the wires.
- Lift the remaining unit from the base to expose the tether.
- Watch the video below for further instructions.
If You Already Have Access to Your Tether
Watch this video for guidance on replacing a crimp, carabiner, or rubber stopper.
Tether Access and Adjustment
To access the tether, follow these steps to disassemble your sensor:
- Remove the top screws with an Allen wrench.
- Use a USB cable to push down the charging port and pull up the case.
- Disconnect the wires.
- Lift the rest of the unit from the base to access the tether.
Watch the start of this video for a visual guide.
Once open:
- Hold the outer shell and rubber stopper to create room for adjustments.
- Disconnect the wires connecting the PCB (green board) to the battery and switch. Keep the top plastic chassis (with the PCB) inside the housing.
- Unscrew the axle screw that holds the spindle in place.
Adjusting the Tether Tension:
- Remove the spindle and axle from the unit. Ensure the tether is still tightly wound.
- Place a screwdriver in the axle hole and carefully lift the spindle. Spin the spindle counterclockwise two full rotations.
- Ensure the screwdriver end of the axle is pointing toward your body for the correct counterclockwise direction.
- Keep the screwdriver in the hole to maintain tension and return the spindle and axle to their original positions.
- Screw the axle back into place while firmly pressing the spindle down to avoid lifting.
Reassembly:
- Reconnect the wires between the PCB, battery, and switch. Ensure the wires are placed neatly inside the unit.
- Reattach the outer shell and check if the tether still has slack.
- If slack remains, repeat the process and try three counterclockwise rotations instead of two.
- If the tether is still affecting functionality, check your warranty or consider our RepOne Protect Plan or a one-time repair service.
Let me know if you need further edits!
Types of Missed Reps
There are two different types of missed reps:
- Missed reps on the RepOne Sensor/Tether side
- Missed reps on the app side (RepOne Personal, Athlete, or Station)
To fix this issue, we first need to identify which type of missed rep you have. If you review previous reps on the OLED display of your Sensor/Tether and all reps are there, the issue is likely in the app. If the reps are missing on the OLED display, the issue is likely with your VBT device.
Missed Reps on RepOne Sensor/Tether
If your RepOne Sensor/Tether is fully charged and you're missing reps, there are a couple of possible reasons:
- Range of Motion (ROM) Issue: The most common reason is a ROM below 150 mm (130 mm for firmware versions after v0.8.25). If the completed reps were close to 150 mm or 130 mm, this is likely the cause.
- Loose Encoder Magnet: The encoder magnet may have become unglued. You can check by pulling a rep with your hand in a quiet environment—if you hear spinning noise after your hand has stopped moving, the magnet might be loose. Contact customer support for next steps if this is the case.
- Firmware Bugs or Power On Reset (POR): Although firmware is thoroughly tested, bugs or a POR may occasionally cause missed reps. A POR is brief, and the OLED display may appear normal by the time your set is done. Recording a video of both the reps and the OLED display can help catch and report this issue to customer support for resolution.
Missed Reps on RepOne Personal, Athlete, or Station
Earlier versions of RepOne Personal had issues when the app was backgrounded (e.g., when recording video in the phone's native camera app or browsing social media between sets). The phone's operating system would "freeze" the app and "unfreeze" it upon reopening, disabling the Bluetooth connection and causing reps to not display.
- iOS: This issue was resolved with an update in late 2023.
- Android: The problem is still device-dependent on Android. To avoid missed reps, keep the RepOne Personal app open during your sets.
This applies to the upcoming RepOne Athlete and RepOne Station apps as well. However, it's rare for RepOne Station to experience backgrounding since it's typically used in professional settings.
Need Further Help?
If neither of these situations applies to you, reach out to customer service for troubleshooting.
Connecting to your device with Bluetooth
Android
Make sure Bluetooth is on. Do not pair the RepOne Device through Settings! ‘Forget’ the device if you have. If you are using Android OS 6.0+ make sure Location Services is on. Then follow the steps below:
- Force kill the RepOne application.
- Turn the RepOne Device off.
- Clear the phone's Bluetooth cache.
- Clear the RepOne application cache.
- Restart your phone.
- Turn the device on.
- Start the RepOne application.
- Select a RepOne Device from the list.
iOS
Make sure Bluetooth is on. Then follow the steps below:
- Force kill the RepOne application.
- Turn the RepOne Device off.
- Restart your phone.
- Turn the RepOne Device on.
- Start the RepOne application.
- Select a RepOne Device from the list.
If the above steps do not work, try uninstalling and re-installing the RepOne app on your phone.
Last but not least, if you still have issues, make sure to contact us with any problems you may still have. Be sure to include your device brand and model, operating system, and operating system version.
Why isn't firmware upload working?
Firmware is the code that runs directly on your RepOne Sensor to do things like calculate reps, display them on the OLED screen, communicate via Bluetooth, etc. If we want to fix bugs or add new features, we need to update the firmware. RepOne Sensor uses a custom-built over-the-air (OTA) device firmware update (DFU) solution that works over Bluetooth Low Energy. This means you don't need to connect your RepOne Sensor to your local Wi-Fi network or do a direct Wi-Fi connection with your mobile device. You can update with the same connection you're already using to do your workout.
As we improve the firmware and app, we'll be adding OTA DFU support for more phones and phone operating systems. In the meantime, you might experience problems where OTA DFU doesn't get past 0%, or gives an error toward the end of the upload process. If this happens, please send us an email with the phone model and operating system version so we can add it to our list. Many more phones work than don't, so here's a current list that has known issues. If you have one of these, we suggest borrowing another device for firmware upload until we add support for your device:
- Several Samsung Galaxy phone models
- iPad Minis with iOS 12 or earlier
- OnePlus 8T
You may have trouble uploading your firmware if you are skipping multiple versions. Please contact us for further instructions.
RepOne Personal App (mobile)
How to Workout with the RepOne Personal App
Logging Workouts in RepOne Personal
- Open the RepOne Personal app and connect to your RepOne Tether.
- Navigate to the Workout tab.
- Ensure your sensor is connected (check the bottom left of the screen) and that your phone is within a reasonable distance for a stable Bluetooth connection.
Entering Workout Details
You can log the following for each set:
- Exercise
- Weight
- RPE
- Tags
- Record Video
Completing Your Workout
- After finishing a set, repeat the steps above for the next set or a new exercise.
- When your workout is complete, click "Finish Workout" (bottom right). This will move all recorded reps and sets to the History tab.
Find Your Deleted Reps
Recovering a Deleted Rep in RepOne Personal
If you accidentally deleted a rep in the RepOne Personal app, you can recover it by following these steps:
- Go to the History tab
- Select Edit Filters
- Enable Show Deleted Sets and Reps
- Tap Apply
- Find the set and rep you want to recover
- Tap the refresh arrow next to the rep
Your rep will now be restored!
How to Access Your History
Accessing Workout History in RepOne Personal
- Open the RepOne Personal app and connect to your RepOne Tether.
- Navigate to the History tab.
- Use Add Filters to find specific sets and reps.
Recovering Deleted Reps
If you have deleted reps, you can retrieve them by following these steps:
- Go to History > Filters > Show Deleted Sets and Reps > Apply.
This will restore any deleted workout data.
How to Change Your Settings in the RepOne Personal App
Customizing Your RepOne Personal App
The RepOne Personal app is designed for individual lifters. Customize it by navigating to the Settings tab, where you can:
- Update Your Firmware
- Export Your Data
- Connect to Your Sensor
- Adjust Rest Time and Units
- Modify Rep Metrics and Set Metrics
- Rearrange Rep Columns
RepOne Set Metrics
RepOne Set Metrics
The RepOne Personal App offers various Set Metrics, which provide insights into performance based on completed sets. These metrics help track progress and optimize training.
Average Velocity Metrics
- Average Set Velocity – The average of all rep velocities in a set, useful for tracking fatigue and progress.
- Absolute Average Velocity Loss – Measures velocity loss over a set.
- Set Average Velocity Loss – Difference between first and last rep velocity.
- Percent Average Velocity Loss – Velocity loss expressed as a percentage.
- First Rep Average Velocity – Helps gauge initial strength post-rest.
- Last Rep Average Velocity – Common for autoregulation, correlating with set RPE.
- Minimum Average Velocity – Lowest recorded velocity in a set.
- Maximum Average Velocity – Highest recorded velocity in a set.
- Slowest Ever Average Velocity – Tracks slowest recorded velocity over time.
- Fastest Ever Average Velocity – Tracks highest recorded velocity over time.
- Peak-End Average Velocity – Averages last and slowest velocity in a set for effort measurement.
Peak Velocity Metrics
- Average Peak Velocity – Average of all peak velocities in a set.
- Absolute Peak Velocity Loss – Difference between fastest and slowest peak velocities.
- Set Peak Velocity Loss – Difference between first and last peak velocities.
- Percent Peak Velocity Loss – Velocity loss displayed as a percentage.
- First Rep Peak Velocity – Peak velocity of the first rep.
- Last Rep Peak Velocity – Peak velocity of the last rep.
- Minimum Peak Velocity – Slowest peak velocity in a set.
- Maximum Peak Velocity – Fastest peak velocity in a set.
- Fastest Ever Peak Velocity – Highest recorded peak velocity over time.
- Slowest Ever Peak Velocity – Lowest recorded peak velocity over time.
- Peak-End Peak Velocity – Average of slowest and last peak velocity in a set.
Range of Motion (ROM) Metrics
- Absolute ROM Loss – Difference between longest and shortest ROM in a set.
- Set ROM Loss – Difference between first and last ROM in a set.
- Percent ROM Loss – ROM loss displayed as a percentage.
- First Rep ROM – ROM of the first rep in a set.
- Last Rep ROM – ROM of the last rep in a set.
- Minimum ROM – Shortest ROM in a set.
- Maximum ROM – Longest ROM in a set.
- Peak-End ROM – Averages shortest and last ROM in a set.
Rate of Perceived Exertion (RPE)
- Set RPE – Subjective difficulty rating for a completed set.
These Set Metrics allow for in-depth tracking and customization within the RepOne Personal App, helping lifters monitor their performance efficiently.
How To Get The Best e1RM Results
How to Get the Most Accurate Estimated 1RM
One Rep Max (1RM) estimation in the RepOne App is based on linear regression, which plots your data on a graph. To ensure the most accurate results, follow these best practices:
Tips for Improving 1RM Estimation
✅ Log a full range of weights – Record everything from warmups (empty bar) to working weights for better regression accuracy.
✅ Use consistent exercise names & tags – Avoid mixing different exercises under the same name (e.g., log "Back Squat" and "Front Squat" separately).
✅ Always log weights – The algorithm needs weight data to plot points accurately.
✅ Set the correct unit (kg/lb) – Ensure your weight units are correctly set in Settings to avoid miscalculations.
✅ Erase false reps – Remove accidental reps caused by unracking or adjusting equipment.
✅ Enter RPE for every set – The algorithm factors in RPE 1RM to refine estimates.
✅ Tag multiple lifters if sharing an account – Use tags to isolate individual performance data.
By following these steps, you can achieve more accurate 1RM calculations and track strength progression effectively.
How the e1RM Algorithm Works
How Our 1RM Estimation Algorithm Works
The RepOne app estimates One Rep Max (1RM) based on the principle that as weight increases, velocity decreases in a linear fashion. By plotting weight vs. velocity and applying linear regression, we can extrapolate your estimated max.
Step-by-Step Breakdown
1️⃣ Identify Relevant Sets (Black Flow Chart)
- Only includes sets that match exercise name, tags, and date range.
- Sets must have weight data and at least one valid rep.
2️⃣ Filter Out Bad Data (Red Flow Chart)
- Removes sets with impossible ROMs (too high or low).
- Eliminates sets with unrealistic velocities (>10m/s or ≤0m/s).
- These invalid sets appear as red dots on your chart.
3️⃣ Select the Most Relevant Sets (Blue Flow Chart)
- Filters sets per workout by choosing either:
- The set with the highest RPE 1RM (based on RTS’s RPE charts).
- OR the first set logged at a given weight.
- Groups weights into 2.5 lb buckets (e.g., 84.5 lbs & 86 lbs go into the 85 lb bucket).
- Uses the latest set in each bucket for the final regression (shown as dark blue dots).
Coaching Portal
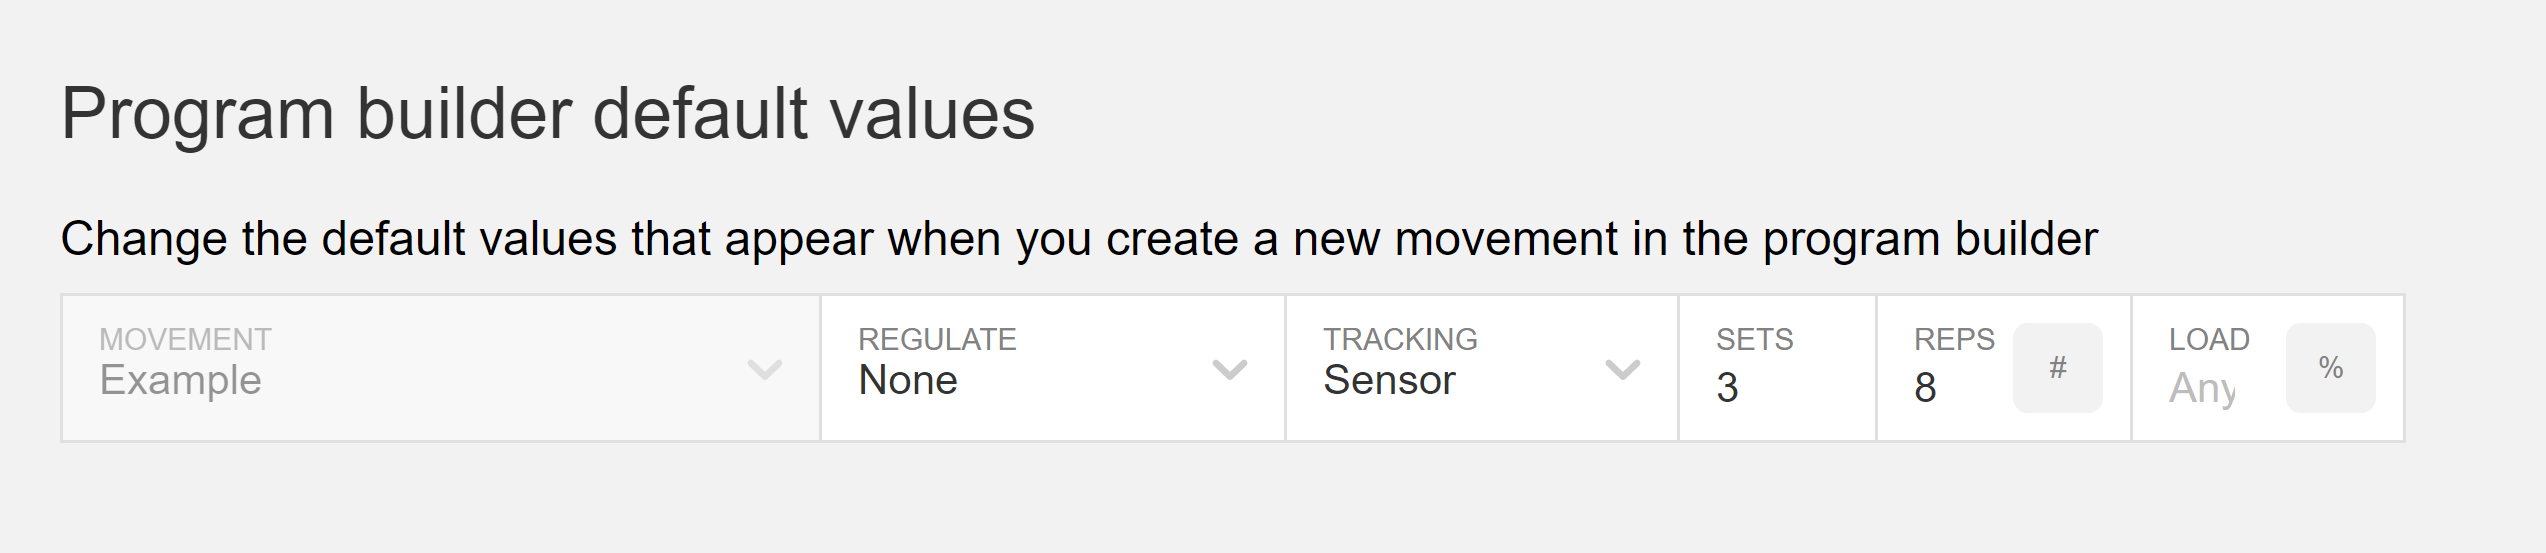
How to Set Defaults in the Program Builder
When creating programs in the RepOne Coach Dashboard, you’ll often add multiple exercises using the program builder. To save time, RepOne offers a default settings feature that allows you to customize fields with your most common preferences.
Steps to Set Program Builder Defaults:
-
Go to Settings

-
Find the "Program Builder Defaults" Section
-
Customize Your Default Fields
- Adjust the fields as you would in the program builder.
- Moving forward, every new row you create will automatically apply these default settings.
Examples of Defaults You Can Set:
- Units: Choose between lbs, kgs, or %.
- Autoregulation: Toggle on or off.
- Sets & Reps: Set your preferred default counts.
How to Add a New Exercise in the Coach Dashboard
The RepOne Coach Dashboard comes preloaded with a basic set of exercises for programming and reporting. However, you can easily add new exercises to customize your training plans.
Steps to Add a New Exercise:
-
Go to the Program Builder
- Click to add a new movement.

- Click to add a new movement.
-
Enter the Exercise Name
- Type the full name of the exercise you want to add.
- Press Enter or select the option to create the new exercise.
-
Save & Access Anytime
- The new exercise will now be saved and available in both the program builder and reports for future use.
How to Set Up Teams and Manage Athletes in RepOne Coach Dashboard
Set Up Teams and Groups

The first step in setting up your roster is to create teams and groups.
- Pro Tip: Organize athletes who will follow the same programming into groups. This allows you to schedule workouts for an entire group (or team) with just one click.
💡 Note: If you're importing athletes from a CSV file, teams and groups will automatically be created based on the source data.
Add and Remove Athletes
You have two options to manage athletes:
- Manually Create Athletes – Ideal for adding a few athletes quickly.
- Import Athletes from CSV – Perfect if you have an existing roster in a spreadsheet. [Click here for CSV import instructions.]
✅ Create an Athlete
- Navigate to the roster section and click “Add Athlete”.
- Fill in the required details like name, team, and group.
- Save the athlete to your roster.
❌ Remove an Athlete
- Select the athlete you want to remove.
- Click “Delete” or “Remove from Team” (depending on your preference).
⚡ Bulk Edit Athlete Data
- Select multiple athletes to update details like group assignments, status, or maxes—all at once.
🔍 Filter and Search Athletes
- Use filters to sort athletes by team, group, position, or other custom fields.
- The search bar helps you quickly locate specific athletes.
Record Athlete Maxes
Keep track of your athletes’ strength metrics by recording their max lifts.
- Choose Visible Maxes: Select which maxes (e.g., squat, bench press, deadlift) you want to display in the dashboard for quick reference.
- Easily update maxes as athletes improve over time.
Watch a Tutorial Video of StrengthOS
📺 StrengthOS Walkthrough Video
Watch the video above to learn how to manage your athletes and get the most out of the RepOne Coach Dashboard:
In This Video, You’ll Learn How To:
- Add Athletes, Groups, and Teams – Organize your roster for efficient programming.
- Create and Schedule Programs – Build workouts and assign them with just a few clicks.
- Export Reports – Track athlete performance and progress with detailed reports.
- View Athletes Working Out Live – Monitor real-time data during training sessions.
- See the Athlete’s View – Experience what athletes see on the Station App (tablet-only) during workouts.
RepOne Connected
What is T2D3?
Lorem ipsum dolor sit amet, consectetur adipiscing elit, sed do eiusmod tempor incididunt ut labore et dolore magna aliqua. Ut enim ad minim veniam, quis nostrud exercitation ullamco laboris nisi ut aliquip ex ea commodo consequat. Duis aute irure dolor in reprehenderit in voluptate velit esse cillum dolore eu fugiat nulla pariatur.
Can I use T2D3 on my phone?
Lorem ipsum dolor sit amet, consectetur adipiscing elit, sed do eiusmod tempor incididunt ut labore et dolore magna aliqua. Ut enim ad minim veniam, quis nostrud exercitation ullamco laboris nisi ut aliquip ex ea commodo consequat. Duis aute irure dolor in reprehenderit in voluptate velit esse cillum dolore eu fugiat nulla pariatur.
Can I change my plan later?
Lorem ipsum dolor sit amet, consectetur adipiscing elit, sed do eiusmod tempor incididunt ut labore et dolore magna aliqua. Ut enim ad minim veniam, quis nostrud exercitation ullamco laboris nisi ut aliquip ex ea commodo consequat. Duis aute irure dolor in reprehenderit in voluptate velit esse cillum dolore eu fugiat nulla pariatur.
What is so great about the Pro plan?
Lorem ipsum dolor sit amet, consectetur adipiscing elit, sed do eiusmod tempor incididunt ut labore et dolore magna aliqua. Ut enim ad minim veniam, quis nostrud exercitation ullamco laboris nisi ut aliquip ex ea commodo consequat. Duis aute irure dolor in reprehenderit in voluptate velit esse cillum dolore eu fugiat nulla pariatur.
Kratos Flywheel
What is T2D3?
Lorem ipsum dolor sit amet, consectetur adipiscing elit, sed do eiusmod tempor incididunt ut labore et dolore magna aliqua. Ut enim ad minim veniam, quis nostrud exercitation ullamco laboris nisi ut aliquip ex ea commodo consequat. Duis aute irure dolor in reprehenderit in voluptate velit esse cillum dolore eu fugiat nulla pariatur.
Can I use T2D3 on my phone?
Lorem ipsum dolor sit amet, consectetur adipiscing elit, sed do eiusmod tempor incididunt ut labore et dolore magna aliqua. Ut enim ad minim veniam, quis nostrud exercitation ullamco laboris nisi ut aliquip ex ea commodo consequat. Duis aute irure dolor in reprehenderit in voluptate velit esse cillum dolore eu fugiat nulla pariatur.
Can I change my plan later?
Lorem ipsum dolor sit amet, consectetur adipiscing elit, sed do eiusmod tempor incididunt ut labore et dolore magna aliqua. Ut enim ad minim veniam, quis nostrud exercitation ullamco laboris nisi ut aliquip ex ea commodo consequat. Duis aute irure dolor in reprehenderit in voluptate velit esse cillum dolore eu fugiat nulla pariatur.
What is so great about the Pro plan?
Lorem ipsum dolor sit amet, consectetur adipiscing elit, sed do eiusmod tempor incididunt ut labore et dolore magna aliqua. Ut enim ad minim veniam, quis nostrud exercitation ullamco laboris nisi ut aliquip ex ea commodo consequat. Duis aute irure dolor in reprehenderit in voluptate velit esse cillum dolore eu fugiat nulla pariatur.
Repairs
What is T2D3?
Lorem ipsum dolor sit amet, consectetur adipiscing elit, sed do eiusmod tempor incididunt ut labore et dolore magna aliqua. Ut enim ad minim veniam, quis nostrud exercitation ullamco laboris nisi ut aliquip ex ea commodo consequat. Duis aute irure dolor in reprehenderit in voluptate velit esse cillum dolore eu fugiat nulla pariatur.
Can I use T2D3 on my phone?
Lorem ipsum dolor sit amet, consectetur adipiscing elit, sed do eiusmod tempor incididunt ut labore et dolore magna aliqua. Ut enim ad minim veniam, quis nostrud exercitation ullamco laboris nisi ut aliquip ex ea commodo consequat. Duis aute irure dolor in reprehenderit in voluptate velit esse cillum dolore eu fugiat nulla pariatur.
Can I change my plan later?
Lorem ipsum dolor sit amet, consectetur adipiscing elit, sed do eiusmod tempor incididunt ut labore et dolore magna aliqua. Ut enim ad minim veniam, quis nostrud exercitation ullamco laboris nisi ut aliquip ex ea commodo consequat. Duis aute irure dolor in reprehenderit in voluptate velit esse cillum dolore eu fugiat nulla pariatur.
What is so great about the Pro plan?
Lorem ipsum dolor sit amet, consectetur adipiscing elit, sed do eiusmod tempor incididunt ut labore et dolore magna aliqua. Ut enim ad minim veniam, quis nostrud exercitation ullamco laboris nisi ut aliquip ex ea commodo consequat. Duis aute irure dolor in reprehenderit in voluptate velit esse cillum dolore eu fugiat nulla pariatur.
RepOne Station App (Tablet)
What is T2D3?
Lorem ipsum dolor sit amet, consectetur adipiscing elit, sed do eiusmod tempor incididunt ut labore et dolore magna aliqua. Ut enim ad minim veniam, quis nostrud exercitation ullamco laboris nisi ut aliquip ex ea commodo consequat. Duis aute irure dolor in reprehenderit in voluptate velit esse cillum dolore eu fugiat nulla pariatur.
Can I use T2D3 on my phone?
Lorem ipsum dolor sit amet, consectetur adipiscing elit, sed do eiusmod tempor incididunt ut labore et dolore magna aliqua. Ut enim ad minim veniam, quis nostrud exercitation ullamco laboris nisi ut aliquip ex ea commodo consequat. Duis aute irure dolor in reprehenderit in voluptate velit esse cillum dolore eu fugiat nulla pariatur.
Can I change my plan later?
Lorem ipsum dolor sit amet, consectetur adipiscing elit, sed do eiusmod tempor incididunt ut labore et dolore magna aliqua. Ut enim ad minim veniam, quis nostrud exercitation ullamco laboris nisi ut aliquip ex ea commodo consequat. Duis aute irure dolor in reprehenderit in voluptate velit esse cillum dolore eu fugiat nulla pariatur.
What is so great about the Pro plan?
Lorem ipsum dolor sit amet, consectetur adipiscing elit, sed do eiusmod tempor incididunt ut labore et dolore magna aliqua. Ut enim ad minim veniam, quis nostrud exercitation ullamco laboris nisi ut aliquip ex ea commodo consequat. Duis aute irure dolor in reprehenderit in voluptate velit esse cillum dolore eu fugiat nulla pariatur.
Your Order
What is T2D3?
Lorem ipsum dolor sit amet, consectetur adipiscing elit, sed do eiusmod tempor incididunt ut labore et dolore magna aliqua. Ut enim ad minim veniam, quis nostrud exercitation ullamco laboris nisi ut aliquip ex ea commodo consequat. Duis aute irure dolor in reprehenderit in voluptate velit esse cillum dolore eu fugiat nulla pariatur.
Can I use T2D3 on my phone?
Lorem ipsum dolor sit amet, consectetur adipiscing elit, sed do eiusmod tempor incididunt ut labore et dolore magna aliqua. Ut enim ad minim veniam, quis nostrud exercitation ullamco laboris nisi ut aliquip ex ea commodo consequat. Duis aute irure dolor in reprehenderit in voluptate velit esse cillum dolore eu fugiat nulla pariatur.
Can I change my plan later?
Lorem ipsum dolor sit amet, consectetur adipiscing elit, sed do eiusmod tempor incididunt ut labore et dolore magna aliqua. Ut enim ad minim veniam, quis nostrud exercitation ullamco laboris nisi ut aliquip ex ea commodo consequat. Duis aute irure dolor in reprehenderit in voluptate velit esse cillum dolore eu fugiat nulla pariatur.
What is so great about the Pro plan?
Lorem ipsum dolor sit amet, consectetur adipiscing elit, sed do eiusmod tempor incididunt ut labore et dolore magna aliqua. Ut enim ad minim veniam, quis nostrud exercitation ullamco laboris nisi ut aliquip ex ea commodo consequat. Duis aute irure dolor in reprehenderit in voluptate velit esse cillum dolore eu fugiat nulla pariatur.